MCP Server
MCP Server
Planhat MCP Server (Model Context Protocol) connects your AI tools to live Planhat data. Leverage it to understand accounts, create custom dashboards, and explore open-ended questions with the full context of your customer data in Planhat.
Planhat MCP Server now supports connecting with Claude, ChatGPT, and your custom apps.
A Planhat account with access to App Center (required to create OAuth apps, typically system admin)
An AI tool that has necessary MCP permissions
A ChatGPT account on Business, Edu or Enterprise plan with admin or owner permissions (to enable Developer Mode)
A Claude account on Pro, Team, or Enterprise plan
Step 1: Create an OAuth app in Planhat
With enterprise-grade permissioning, you decides exactly what data model the MCP app can access and what stays off-limits.
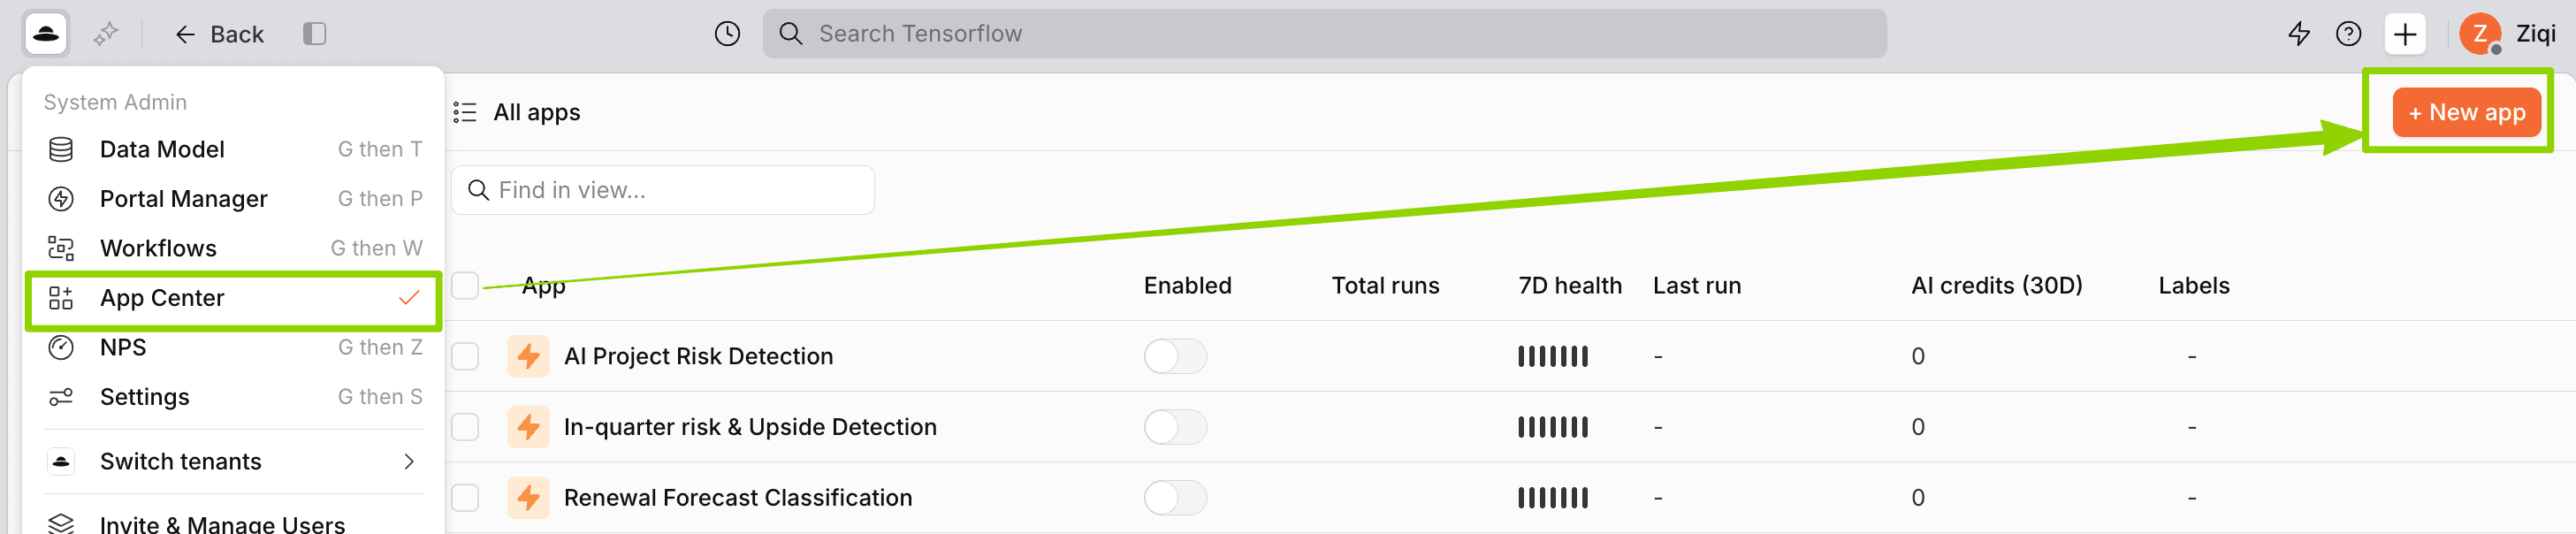
In Planhat, go to App Center → New App → OAuth Client
Give it a name (eg. “Claude Connector”)
Under Application Profile, add a short description that will appear on the authorization screen. For example: “Planhat connector for Claude”
Optional: Add a logo
Set the permission levels for the Planhat data models you want Claude to access
In the Redirect URLs field, enter:
https://claude.ai/api/mcp/auth_callback
Step 2: Save and copy your credentials
Go to claude.ai and open Settings
Navigate to Connectors (or Integrations, depending on your plan)
Click Add Connector and select Custom OAuth
Fill in the following fields
Name: Planhat
Remote MCP Server URL:
https://api.planhat.com/v1/mcpClient ID: Your ID starting with
pk_..credential from step 2Client Secret: Your secret starting with
sk_..credential from step 2
Click Save
Step 3: Add connector in Claude.ai
Go to claude.ai and open Settings
Navigate to Connectors (or Integrations, depending on your plan)
Click Add Connector and select Custom OAuth
Fill in the following fields
Name: Planhat
Remote MCP Server URL:
https://api.planhat.com/v1/mcpClient ID: Your ID starting with
pk_..credential from step 2Client Secret: Your secret starting with
sk_..credential from step 2
Click Save
Step 4: Authorize connection
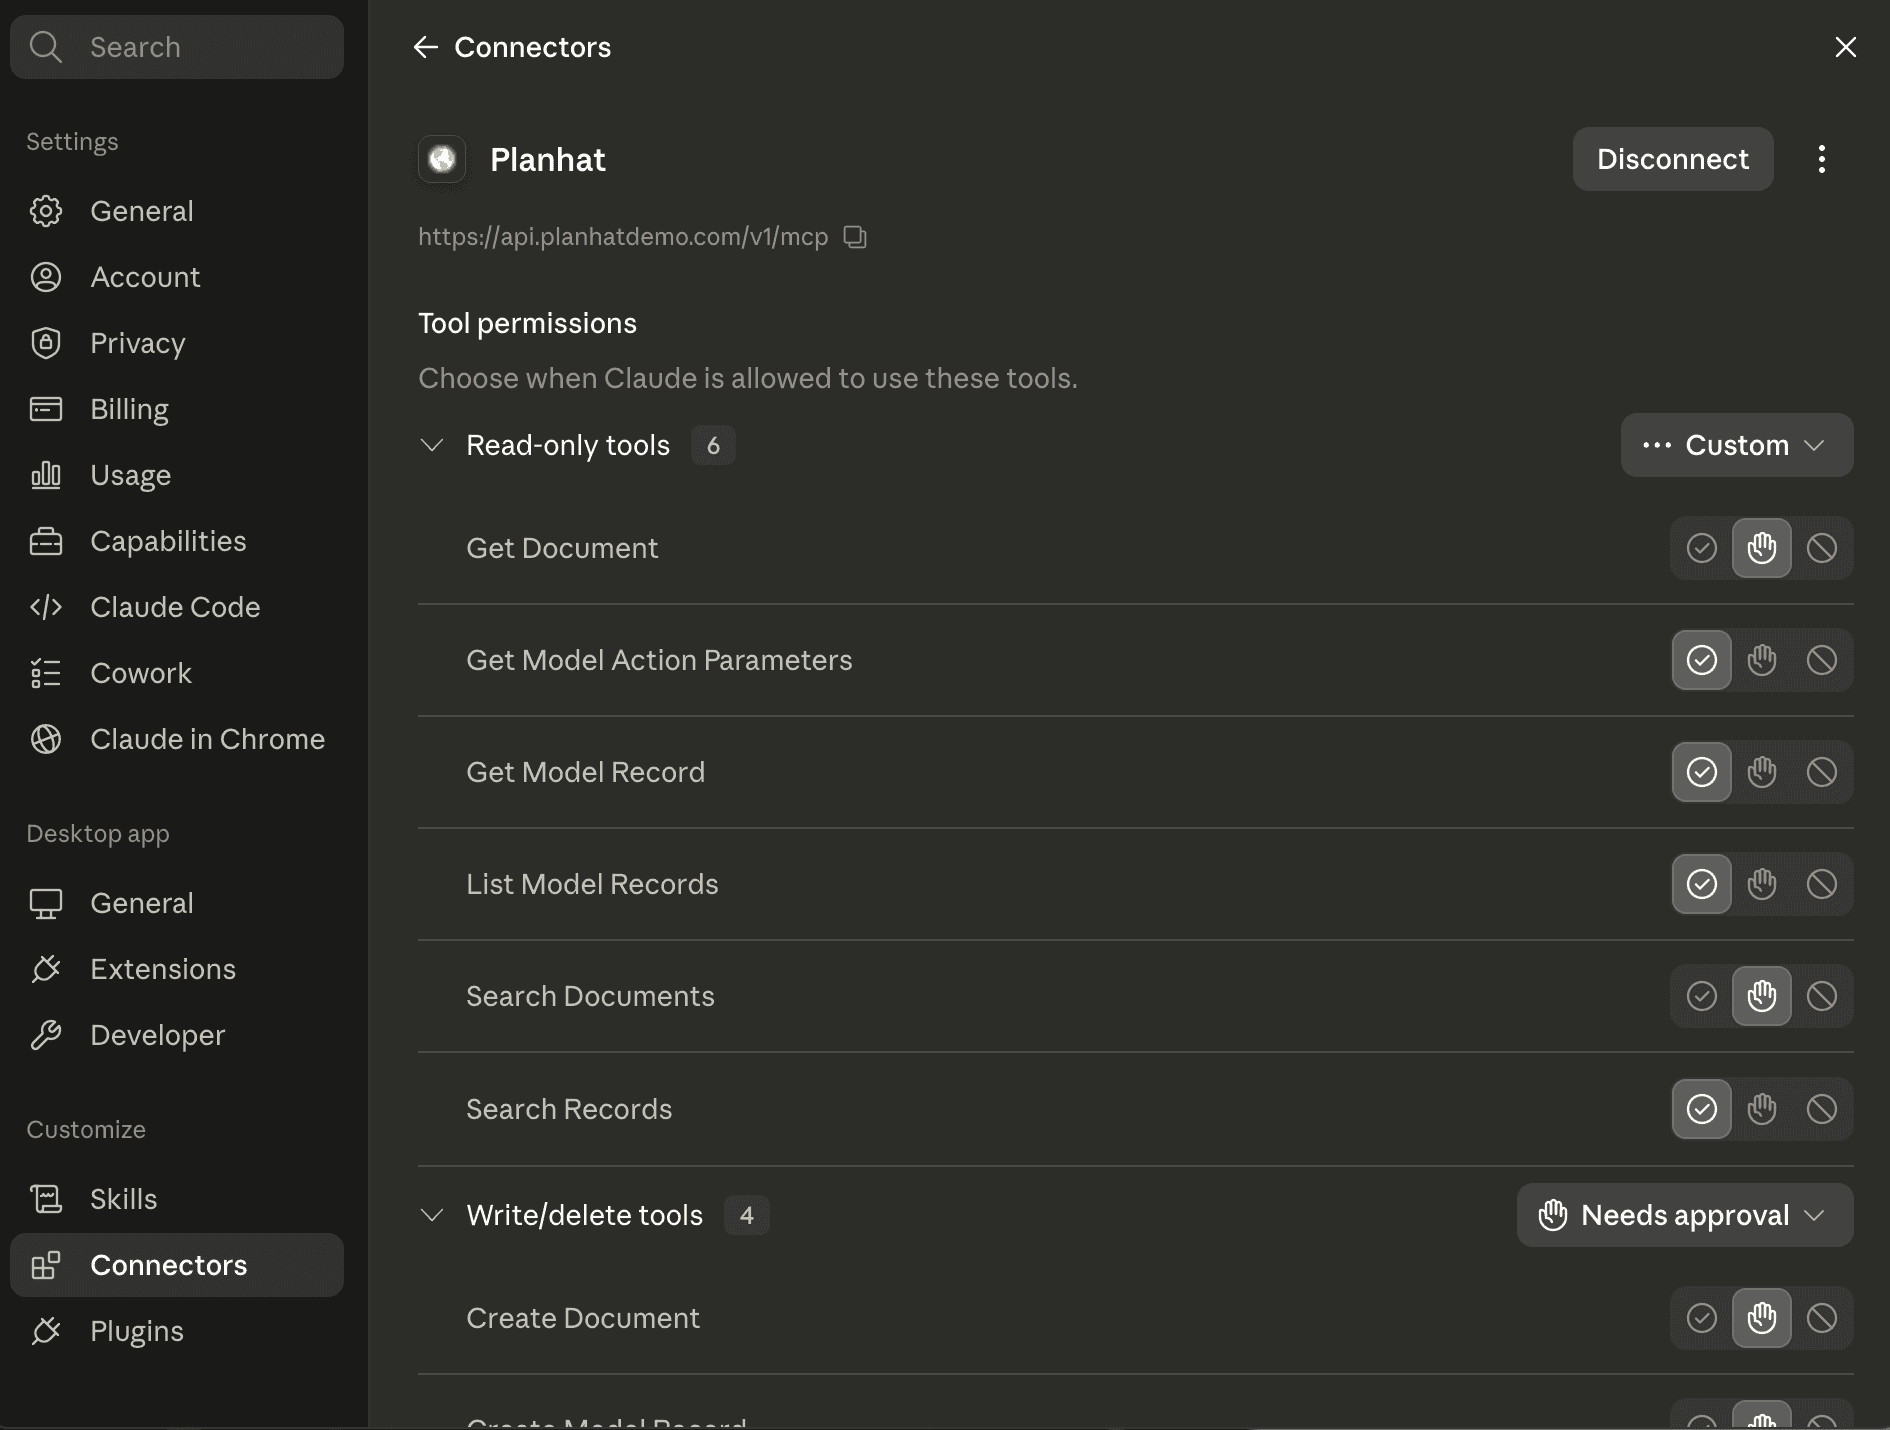
After saving, Claude will redirect you to a Planhat authorization screen
Review requested permissions and then click Authorize. You can change these at any time.
Your Planhat connection will appear as Connected in your connectors list
Step 5: Verify connection
To confirm that everything is working, start a new conversation in Claude and try a simple query: “Show me my top 3 companies in Planhat by ARR”
Step 1: Create an OAuth app in Planhat
With enterprise-grade permissioning, you decides exactly what data model the MCP app can access and what stays off-limits.
In Planhat, go to App Center → New App → OAuth Client
Give it a name (eg. “Claude Connector”)
Under Application Profile, add a short description that will appear on the authorization screen. For example: “Planhat connector for Claude”
Optional: Add a logo
Set the permission levels for the Planhat data models you want Claude to access
In the Redirect URLs field, enter:
https://claude.ai/api/mcp/auth_callback
Step 2: Save and copy your credentials
Go to claude.ai and open Settings
Navigate to Connectors (or Integrations, depending on your plan)
Click Add Connector and select Custom OAuth
Fill in the following fields
Name: Planhat
Remote MCP Server URL:
https://api.planhat.com/v1/mcpClient ID: Your ID starting with
pk_..credential from step 2Client Secret: Your secret starting with
sk_..credential from step 2
Click Save
Step 3: Add connector in Claude.ai
Go to claude.ai and open Settings
Navigate to Connectors (or Integrations, depending on your plan)
Click Add Connector and select Custom OAuth
Fill in the following fields
Name: Planhat
Remote MCP Server URL:
https://api.planhat.com/v1/mcpClient ID: Your ID starting with
pk_..credential from step 2Client Secret: Your secret starting with
sk_..credential from step 2
Click Save
Step 4: Authorize connection
After saving, Claude will redirect you to a Planhat authorization screen
Review requested permissions and then click Authorize. You can change these at any time.
Your Planhat connection will appear as Connected in your connectors list
Step 5: Verify connection
To confirm that everything is working, start a new conversation in Claude and try a simple query: “Show me my top 3 companies in Planhat by ARR”
Step 1: Get your Planhat API token
Navigate to App Center in Plahat
Create a new private app
Assign the necessary permissions
Generate and copy your access token
Step 2: Locate and Edit the Configuration File (MacOS)
Open Finder
Press
Cmd + Shift + GType
~/Library/Application Support/Claude/Locate
claude_desktop_config.json.If it doesn't exist, create a new file with this name. Open with Text Editor
Step 2: Locate and Edit the Configuration File (Windows)
Open File Explorer
In address bar, type
%APPDATA%\Claude\Locate
claude_desktop_config.json.If it doesn't exist, create a new file with this name. Open with Text Editor
Step 3: Locate and Edit the Configuration File (Windows)
Add the JSON for empty or existing configuration.
Find and replace
tokenwith the Planhat API tokenSave file
Step 4: Restart Claude Desktop and Refresh MCP Configuration
Restart Claude Desktop
Press "Reload MCP Configuration". If it's not visible in developer tab, go to "Help" / "Troubleshooting" / "Enable developer settings"
Step 5: Verify Setup
Verify hammer/connection icon in bottom right corner of chat input box
Press to see available MCP servers
Verify Planhat is listed
Alternatively, go to "Settings" / "Developer" tab to see if the server is running
Example Request
Step 1: Enable Developer mode and create Planhat App in ChatGPT
In ChatGPT, go to Settings → Apps → Advanced Settings, enable Developer Mode. Navigate to Settings → Apps → Create
Once new app form opens, enter
Name: eg. Planhat, description optional
MCP Server URL:
https://api.planhat.com/v1/mcpAuthentication: OAuth
Expand Advanced Settings
Set Registration method to User-Defined Oauth Client in Client registration
You will now see Callback URL, e.g.
https://chatgpt.com/connector/oauth/..Click copy, as you will need this in the next step. Do not close this screen.
The Callback URL is unique for your connector. If this value is missing or incorrect, the OAuth flow will fail with Invalid redirect_uri.
Step 2: Create an OAuth app in Planhat
In Planhat, go to App Center → New App → OAuth Client
Give it a name, for example “ChatGPT Connector”
Under Application Profile, add a short description that will appear on the authorization screen. For example: “Planhat connector for ChatGPT”
Optional: Add a logo
Set the permission levels for the Planhat data models you want ChatGPT to access
In the Redirect URLs field, enter Callback URL coped from step 1
Step 3: Save and copy your credentials
Click Save. Planhat will generate two values
Client ID - a public identifier for your app (starts with
pk_..)Client Secret - a private key shown only once (starts with
sk_..)
Copy the Client Secret and store it securely. Planhat will not show it again after you leave the screen. If you don't have it saved, you will need to generate a new one and existing connections will be disconnected.
Step 4: Complete app setup in ChatGPT
Switch back to ChatGPT
In the Oauth advanced settings panel, enter the credentials from Planhat
Client ID: Your ID starting with
pk_..from credentialsClient Secret: Your secret starting with
sk_..from credentials
Click Create
Step 5: Verify connection
To confirm that everything is working, start a new conversation in ChatGPT and try a simple query: “Show me my top 3 companies in Planhat by ARR.”
Step 6: Publish to your workspace
Once the connection is verified, follow the instructions below to allow users in your workspace to find and connect to the app themselves. Each user authenticates with their own Planhat account on first use, access is always scoped to their individual permissions. Restrict this with role-based access control.
Go to Workspace Settings → Apps
Find the Planhat app and click Publish
401 Unauthorized
Caused by missing or invalid access token. Check the Authorization: Bearer <token>/<token> and ensure token is active and valid.
403 Forbidden
Caused by token lacking permissions. Solve by updating app permissions in App Center.
404 Not Found
Caused by invalid MODEL_ROUTE or OPERATION. Fix by confirming supported models/operations using get_model_actions.
400 Bad Request
Caused by missing or invalid parameters. Ensure correct types and required fields are correct by checking get_model_action_parameters.
429 Too Many Requests
Rate limit hit. Retry with delay, use Retry-After header if present
500 Internal Server Error
Unexpected server-side issue. Retry the request, report to Planhat Team with request details if persistent.
This setup is only for Claude Desktop, not the Web App. If configuration is to demo environment, update URL in configuration file to https://api.planhatdemo.com/v1/mcp
The MCP Server does not automatically expose your entire Planhat workspace. Access is scoped by the app permissions you configure.
OAuth Client (recommended)
The data available through a Oauth Client is determined by the intersection of two permission layers:
The permissions granted to the OAuth Client in App Center
The user's existing permissions in the Planhat system
This means the MCP Server can only access data that is allowed by both layers.
For example:
If the OAuth Client is not allowed to create or delete records, the user cannot create or delete records through MCP, even if the user has those permissions in Planhat.
If the OAuth Client is not allowed to access Conversations, the user will not be able to access Conversations through MCP, even if the user can see Conversations in Planhat.
If the OAuth Client allows access to Companies, but the user does not have access to a specific company or company field in Planhat, that data will not be available through MCP.
Private Apps (legacy)
The data available through a Private App is determined entirely by the configs defined during its setup, as it is user-agnostic.
The Planhat MCP Server supports write operations, including creating, updating, and deleting data. This enables flexible workflows where AI assistants can help keep Planhat records up to date.
However, we recommend being deliberate when enabling write permissions, especially for destructive operations such as deleting records. AI agents can misunderstand intent, act on incomplete context, or make mistakes when interpreting open-ended prompts.
As a best practice:
Grant only the permissions required for the intended workflow.
Avoid enabling delete permissions unless there is a clear and controlled use case.
Start with read-only access when testing a new MCP connection.
Review the data an AI tool plans to create, update, or delete before confirming the action.
Double-check important results before writing them back to Planhat through MCP.
These guardrails help ensure that MCP-based workflows remain useful, controlled, and aligned with your team’s data governance practices.
The following tools are available through Planhat MCP.
get_model_action_parameters — returns field metadata (names, types, required flags) for a model. This is the prerequisite for constructing valid create/update calls and valid SELECT/FILTER clauses.
list_model_records — list/query many records with FILTER, SORT, LIMIT, OFFSET, SELECT. Filters use the { "fieldId[operator]": "value" } syntax, with operators like equal to, not equal to, more than, less than, contains, does not contain, starts with, ends with, has value, has no value.
get_model_record — fetch a single record by ID.
search_records — full-text discovery across models when you don't know IDs. Returns ~20 top hits (not for exhaustive export). Optional INCLUDE_COMMENTS to also search Comment records.
create_model_record — create a record.
update_model_record — update a record by ID.
delete_model_record — delete a record by ID.
create_document — create a page (NAME, CONTENT, OWNER, optional IS_PUBLIC).
get_document — retrieve a page by ID in html, md, or text.
search_documents — text search across pages with LIMIT/OFFSET.
Overview
Use your AI tool’s natural-language interface to interact with Planhat’s managed data. You can summarize customer insights, create custom dashboards, and explore open-ended questions about specific accounts or portfolios.
You can also combine Planhat MCP with your AI tool’s native skills, such as ppt creation, document drafting, or statistical data analysis, as well as third-party connectors, to generate broader deliverables.
For CSMs
Account Overview — understand customer status, health, risks, usage, and key context
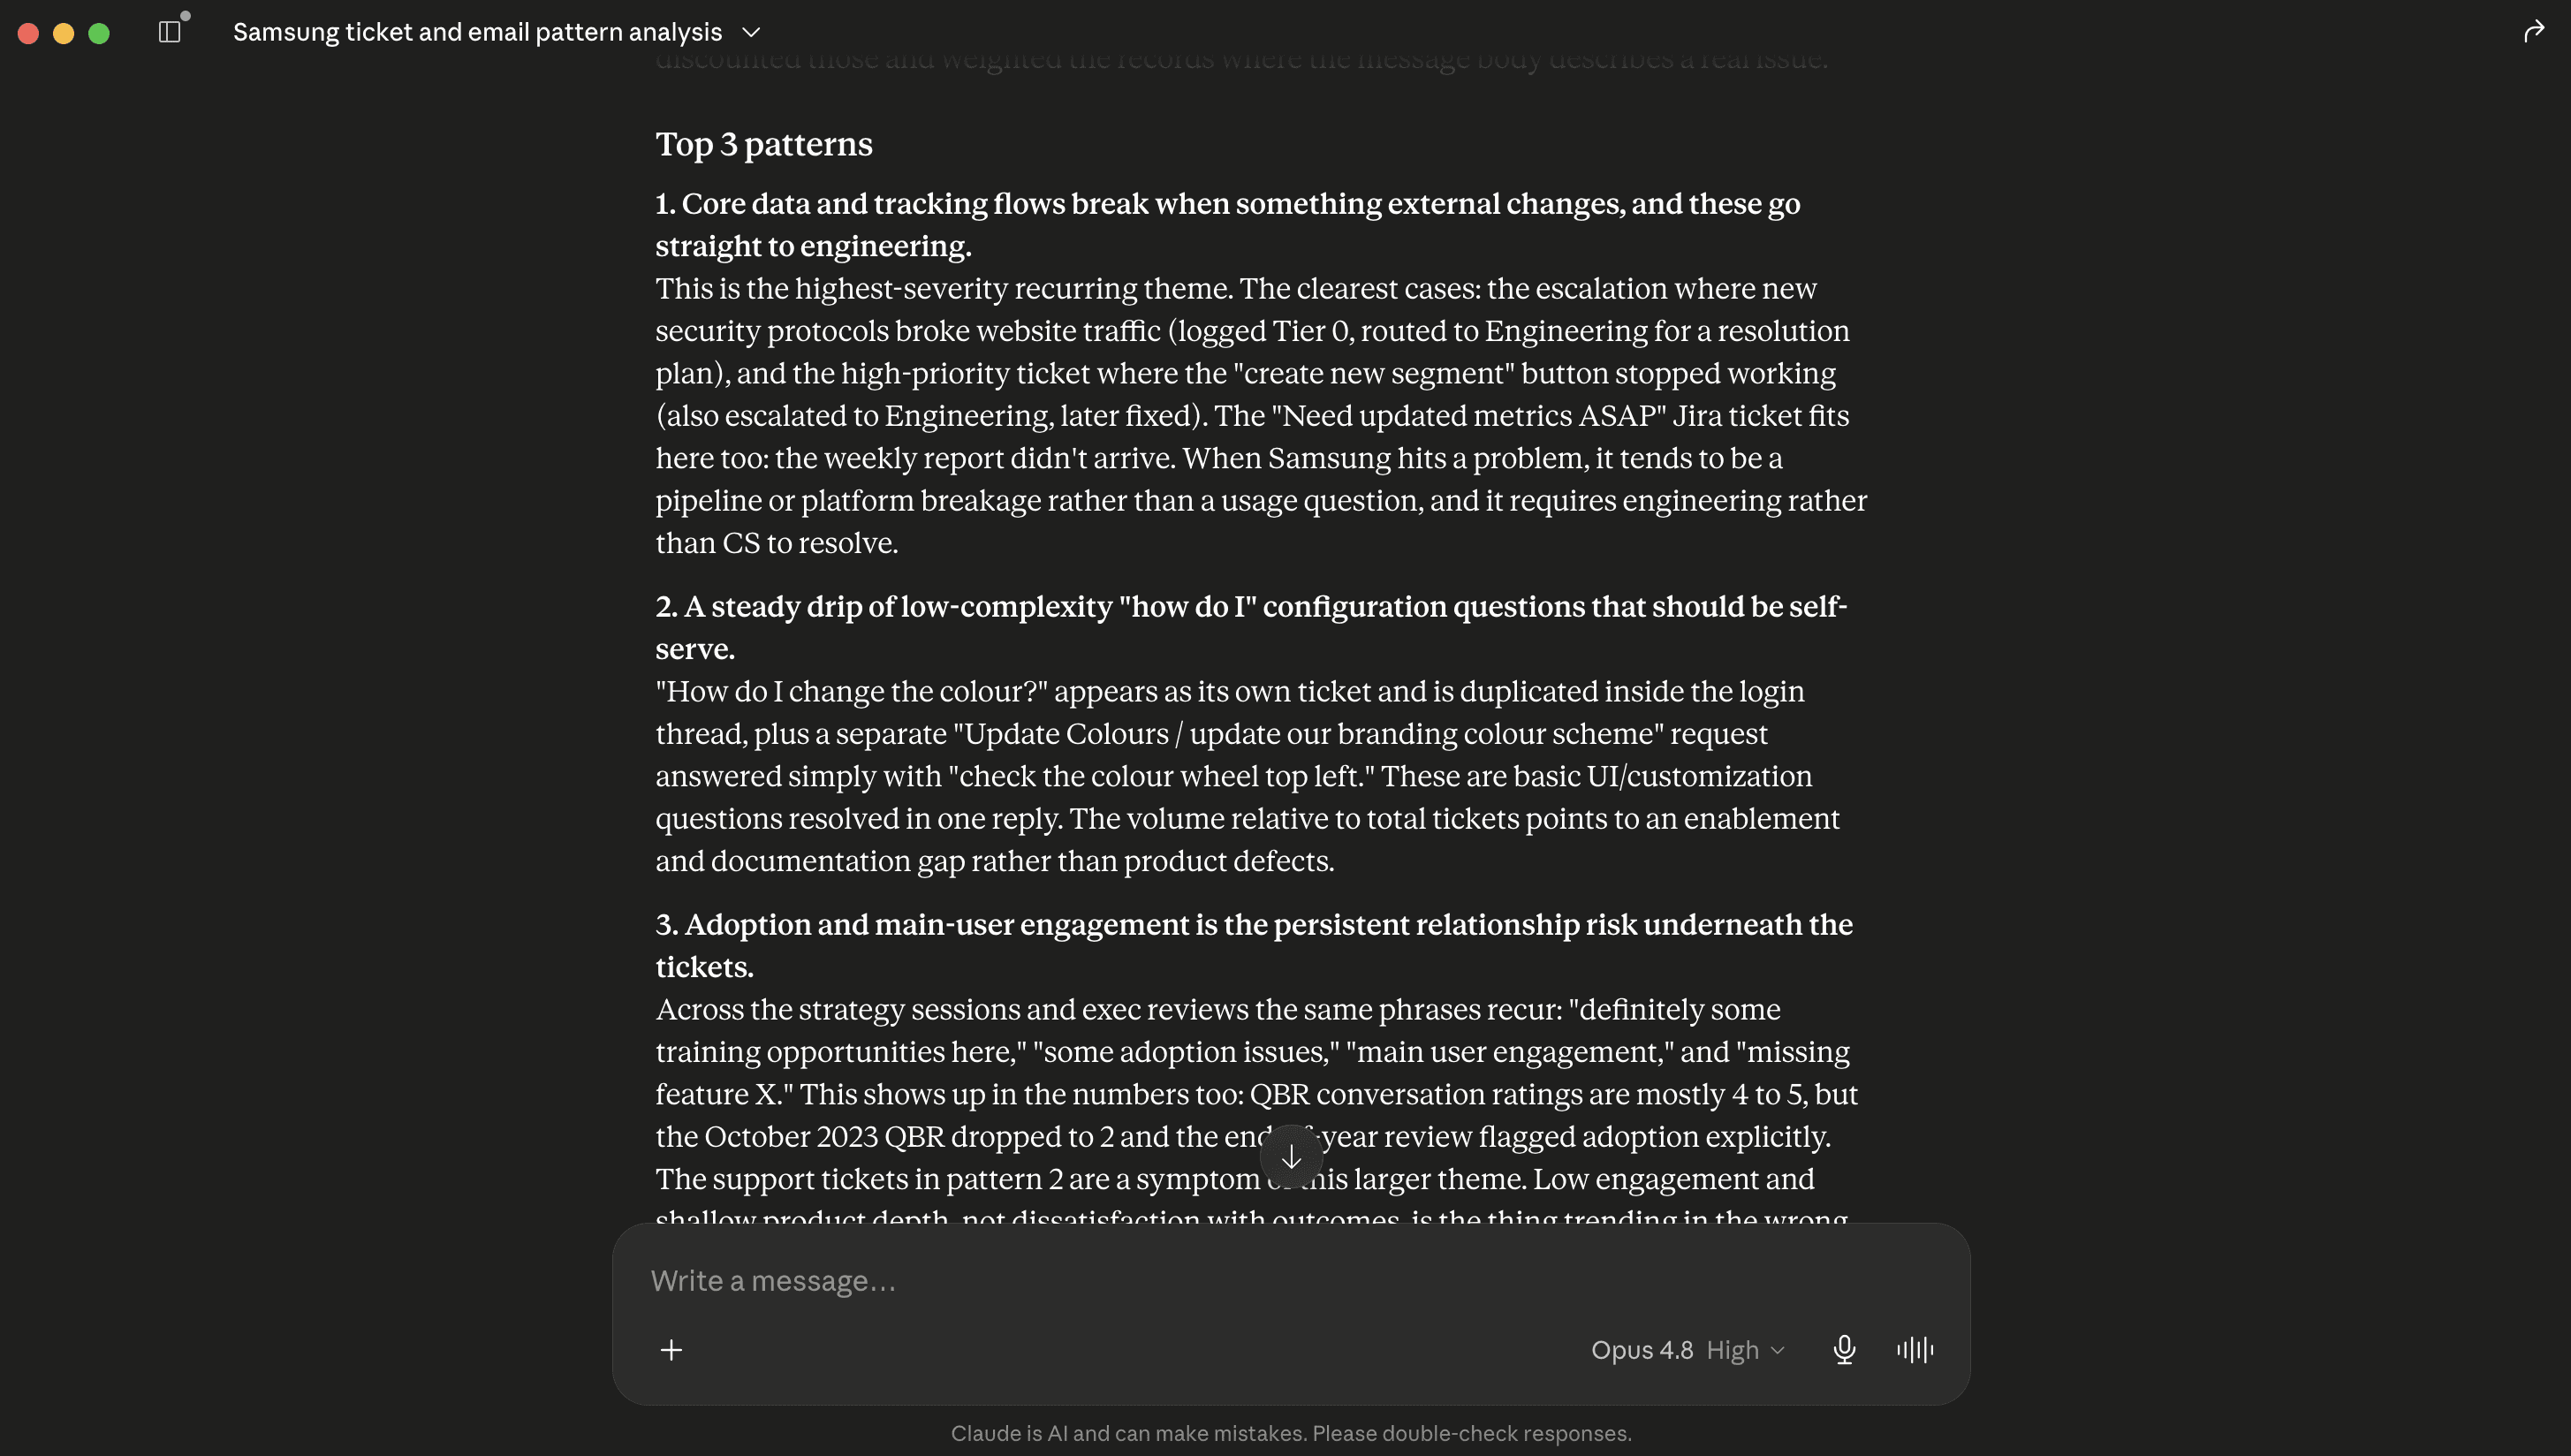
Use Planhat MCP to synthesise all tickets / emails for [Customer] and identify top 3 patterns
Use Planhat MCP to build a dashboard that visualises data about my customers’ Health Scores, NPS and tell me which customers are most at-risk
Meeting Prep — prepare for customer calls, QBRs, renewals, and follow-ups
What are the main points I should address in my upcoming QBR with [customer]?
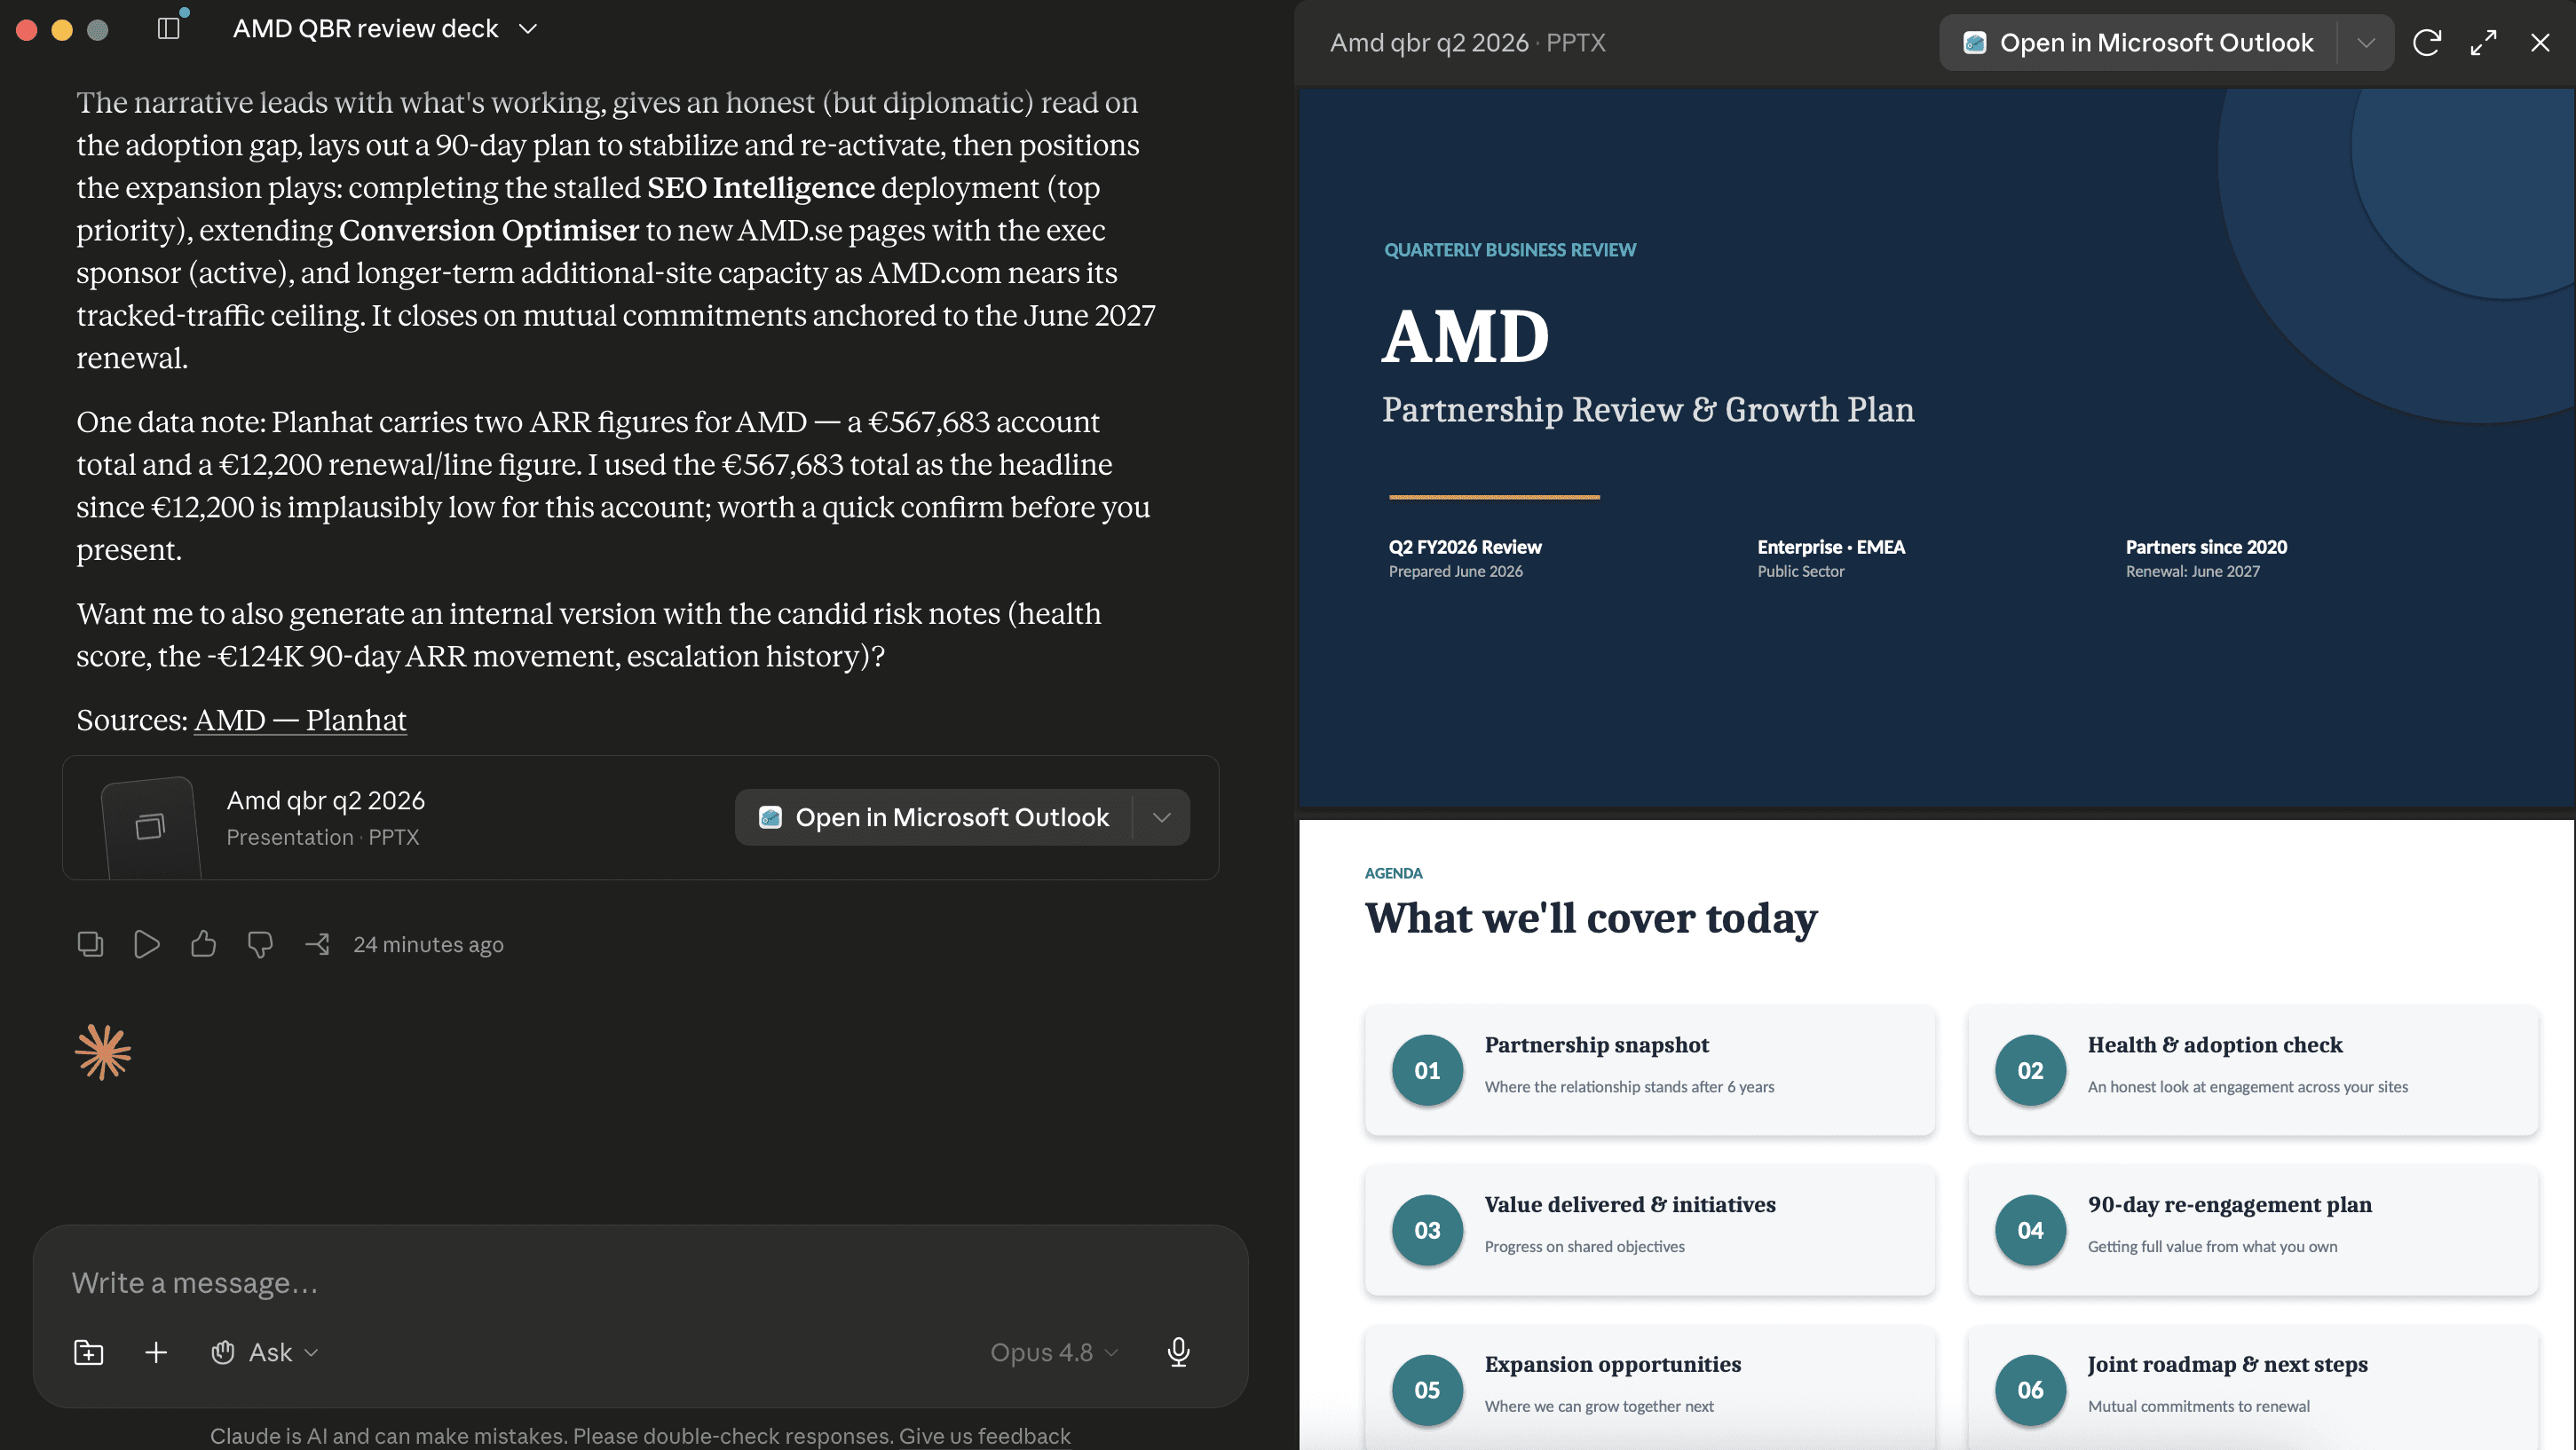
Use Planhat MCP to get key metrics and initiative progress on AMD and create a ppt deck for me their upcoming QBR review. Make sure to address expansion opportunities.
Action Planning — brainstorm next best actions, risks to address, and tasks to create
Use Planhat MCP to create a recovery plan for [customer] based on their risks, tickets, usage, and stakeholder activity.
How can I win an upsell for [customer] this month?
For CS Leaders
Team Overview — understand portfolio health, team activity, renewals, and risks
Which CSMs have the highest-risk portfolios this quarter?
Use Planhat MCP and show me accounts with no meaningful CSM activity in the last 14 days
Executive Reporting — generate leadership-ready summaries, trends, and key metrics
Use Planhat MCP to create an executive dashboard showing customer health, renewal risk, expansion pipeline, NRR risk, and key trends
Use Planhat MCP to generate a weekly CS leadership summary covering health movements, new risks, renewals, expansions, and customer escalations
Strategy Exploration — explore patterns, segments, opportunities, and systemic risks
We went below our renewal forecast in Q3. What went wrong?
We seemed to have more churns in [Segment]. Why? What’s driving that?
Use Planhat MCP to get churn data. What patterns do you see in churns in past three months? Build a model to explore top 5 contributing factors and generate a report for me. (Note: Install Claude-native data analysis skills for better results; Make sure to check analysis process / code in details before trusting it. )
Overview
Use your AI tool’s natural-language interface to interact with Planhat’s managed data. You can summarize customer insights, create custom dashboards, and explore open-ended questions about specific accounts or portfolios.
You can also combine Planhat MCP with your AI tool’s native skills, such as ppt creation, document drafting, or statistical data analysis, as well as third-party connectors, to generate broader deliverables.
For CSMs
Account Overview — understand customer status, health, risks, usage, and key context
Use Planhat MCP to synthesise all tickets / emails for [Customer] and identify top 3 patterns
Use Planhat MCP to build a dashboard that visualises data about my customers’ Health Scores, NPS and tell me which customers are most at-risk
Meeting Prep — prepare for customer calls, QBRs, renewals, and follow-ups
What are the main points I should address in my upcoming QBR with [customer]?
Use Planhat MCP to get key metrics and initiative progress on AMD and create a ppt deck for me their upcoming QBR review. Make sure to address expansion opportunities.
Action Planning — brainstorm next best actions, risks to address, and tasks to create
Use Planhat MCP to create a recovery plan for [customer] based on their risks, tickets, usage, and stakeholder activity.
How can I win an upsell for [customer] this month?
For CS Leaders
Team Overview — understand portfolio health, team activity, renewals, and risks
Which CSMs have the highest-risk portfolios this quarter?
Use Planhat MCP and show me accounts with no meaningful CSM activity in the last 14 days
Executive Reporting — generate leadership-ready summaries, trends, and key metrics
Use Planhat MCP to create an executive dashboard showing customer health, renewal risk, expansion pipeline, NRR risk, and key trends
Use Planhat MCP to generate a weekly CS leadership summary covering health movements, new risks, renewals, expansions, and customer escalations
Strategy Exploration — explore patterns, segments, opportunities, and systemic risks
We went below our renewal forecast in Q3. What went wrong?
We seemed to have more churns in [Segment]. Why? What’s driving that?
Use Planhat MCP to get churn data. What patterns do you see in churns in past three months? Build a model to explore top 5 contributing factors and generate a report for me. (Note: Install Claude-native data analysis skills for better results; Make sure to check analysis process / code in details before trusting it. )